Tuesday, December 2, 2014

a little blue


no words tonight.  not really.  just art.  swirls of blue.  yeah i'm a little blue tonight.  words can't express it well.  colors can.  swirls of the brush can.  this music does.  i express it in my breathing as my brush swoops through the colors and the music crescendos into deeper, darker colors, then pulls backs and lightens up, or switches direction.  this is my song.  my unseen performance.


i'm on a mermaid kick right now, really grooving these blues and purples and water images and free creatures, wild, abandoned to the bliss of the sea...  yeah and i'm also feeling a bit blue, no matter why, it'll all be ok, but these pictures speak many things to me.   i keep them in my sorta private art journal... where it's all about creating just for me mostly.. no pressure to make a canvas-perfect piece to hang on the wall... no pressure to make something i can sell...no.  this is just for me.  my me time.  my therapy.


i'll come back to this another time.  at least to share the finished product, if not a few sparse words about its meaning to me.  art doesn't need to be explained.  that's the beauty of it.  submerging again....

Sunday, November 23, 2014

painted paper collage


Welcome back!  
I am now ready to show you my process, step-by-step, for creating the above collage painting of some simple flowers.

You will need the following supplies:

scrapbook/patterned papers with a variety of colors and patterns
 (I cut mine down to various sizes, as shown above)
gesso (a thick white paint to obscure the paper colors a bit, mute them)
tissue paper, preferably white so the colored papers will show through
glue (I like mod podge, but watered-down white glue is fine)
foam brushes/cheap white paint brushes
acrylic paints (choose colors intuitively, either to match or clash with your backgrounds! get crazy!)
metallic gold acrylic paint
paintbrushes 
(my faves: 1/2" flat,
scruffy brush, and long skinny liner brush)

step one: lay out all your various scrapbook papers to choose from
(and if you have cats, watch them go wild trying them all out as their new favorite seats!)

                                           
                         Trim your scrapbook papers down to whatever size you want.  These are your                               background papers, onto which your flowers will soon appear.


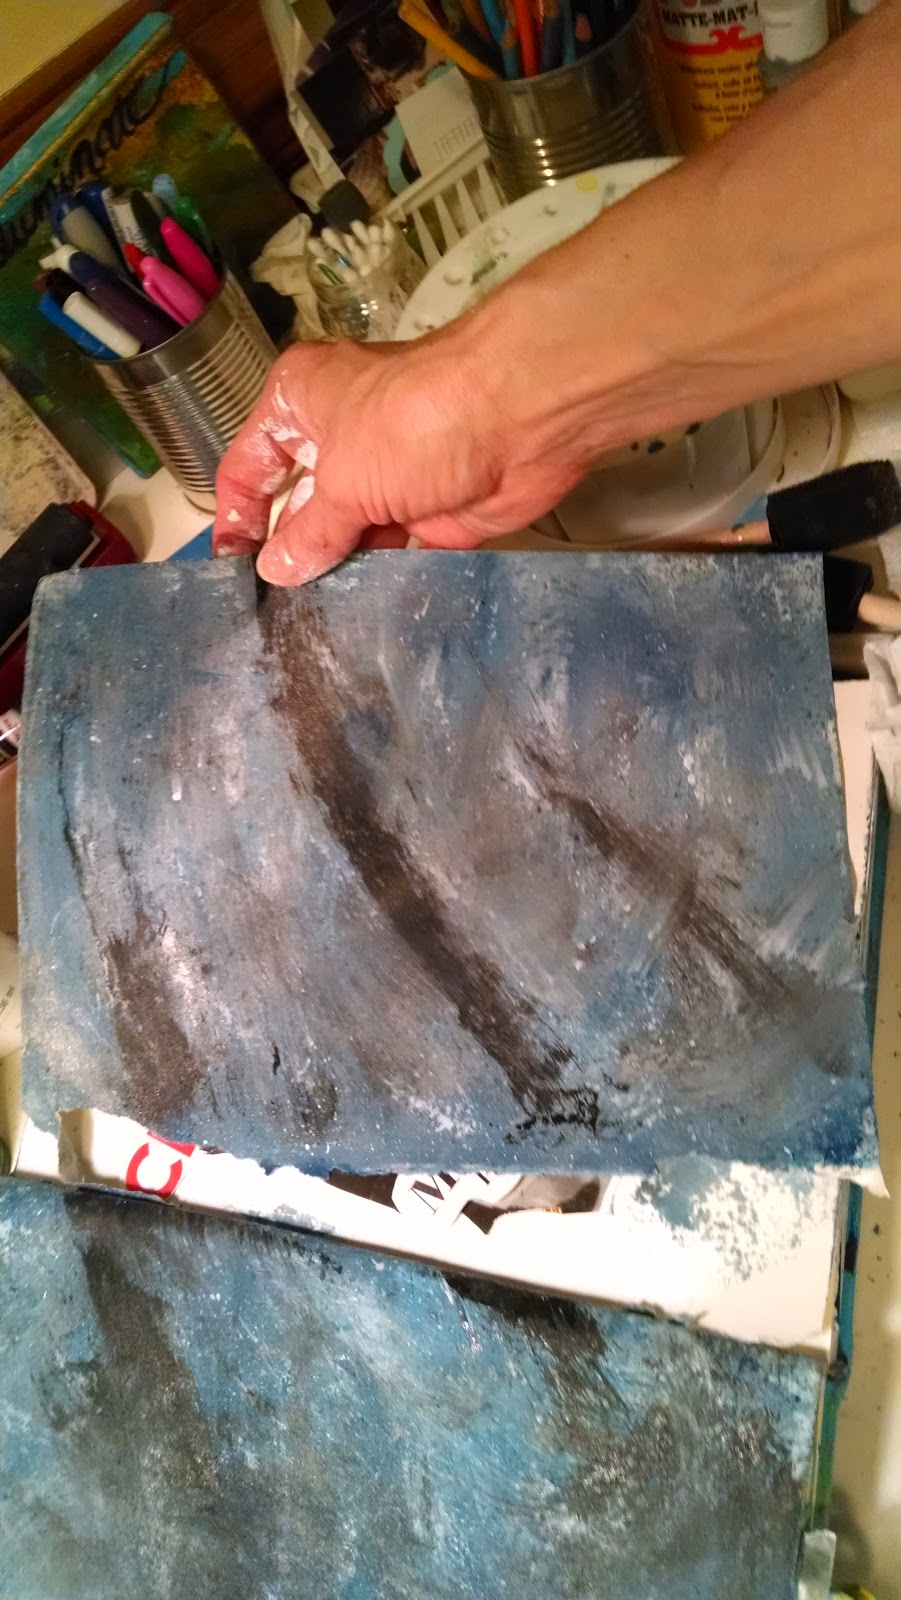
              Now I go to work slapping down some gesso, in thin streaks, across the papers, to mute the colors a bit. Give the background a bit of "white space" to make the flowers "pop".                


                        I like to add a narrow strip of contrasting paper across the middle of the page, about 2/3 down from the top, to act as a grounding piece, sort of a horizon.  I chose some of these cool water or grassy images from this "photo real" stack of scrapbook paper.

                         
Instead of cutting with a scissors, I tear the edges to give it a rugged, natural look.  Experiment with pulling the paper towards you or away from you as you tear, to give you different edges. (you'll see what i mean when you do it...)

Glue down the strip.  I made 6 of these at once, so I could work assembly-line style, and get a lot more done when all of the processes were complete.


Next, cut a sheet of tissue paper to a little bit larger than your background paper.  Crinkle up the tissue paper, and carefully flatten it out again, leaving lots of wrinkles for some yummy texture. Spread glue across the background, then very care-ful-ly flatten the tissue paper down.  Add another thin Use the foam brush dipped in a little glue to spread it out, flatten it down till it's completely covered and secure.  Make sure you left plenty of lumpy wrinkly spots, wrinkles give us character!! :-D


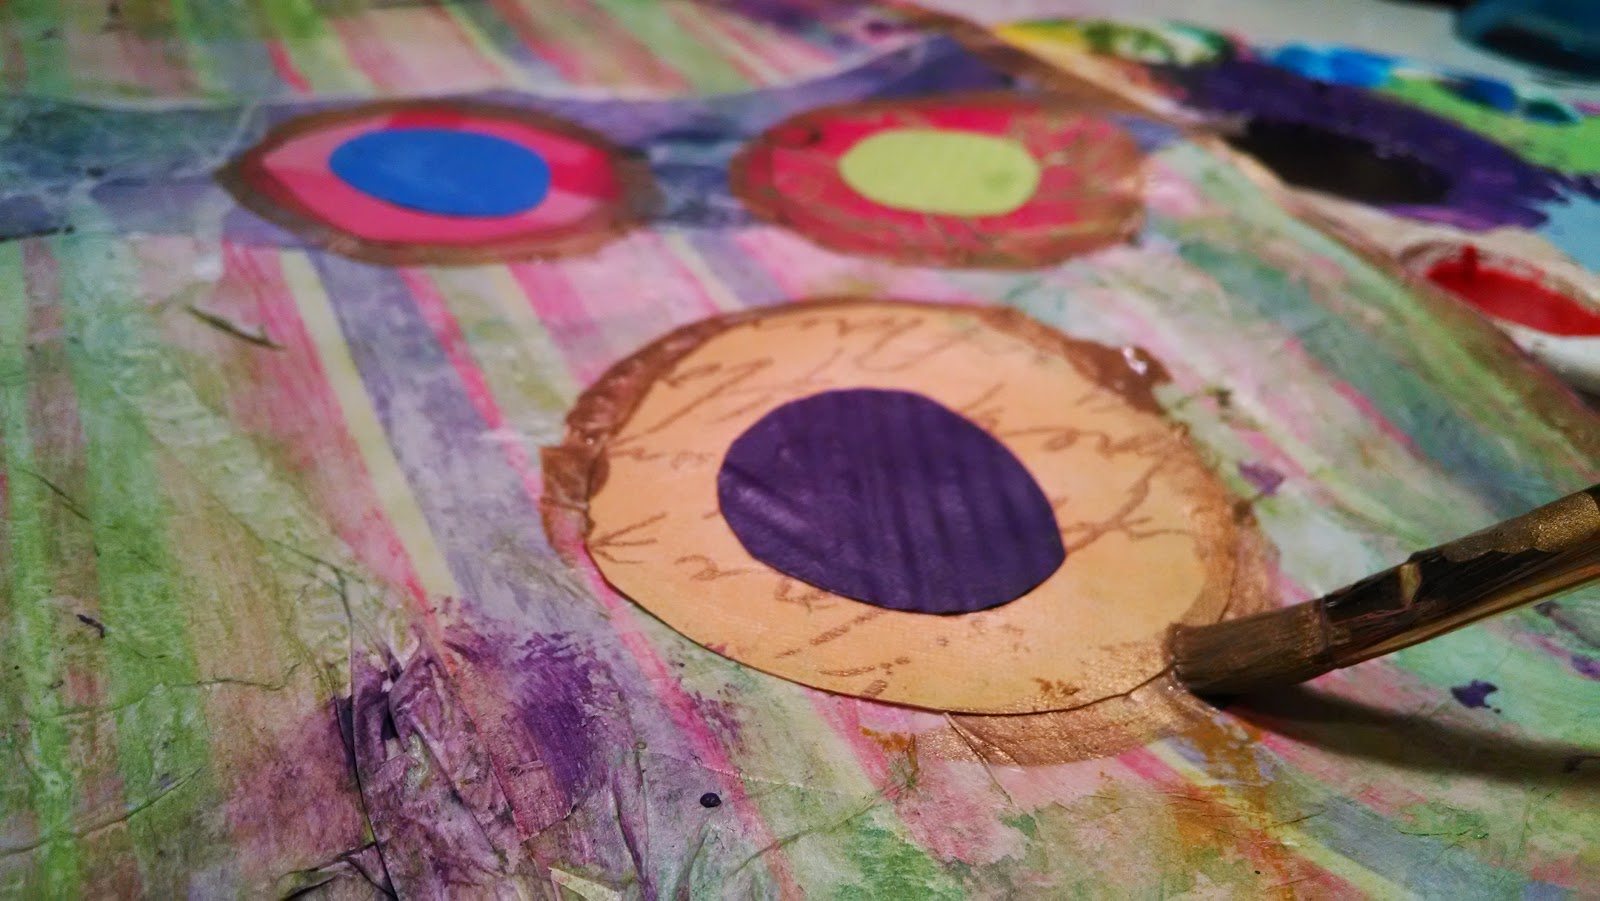
Here's the fun part: making circles!  Find all those fun patterned papers again, and start cutting circles out of it in two different sizes, a larger one (about 2-1/2") for the outer circle and a smaller one (1") for the center. I use a glue stick to glue the center dots to the bigger circles.  Have fun pairing different colors and patterns in interesting combinations.  They'll be lightly painted over later, so don't worry if the colors look creepy together.

               
                             You might be tempted to use a circle cutter or circle punch for these, if you have plethora of scrapbooking supplies like I do, and I did succumb to the temptation for awhile, but they really look better, more natural and organic-ish if you just freehand them.
             

Glue the circles to your backgrounds however you wish.  These are the blooms of your flowers!


Next, add some contrasting colored paint to your background, using a flat brush.  Work lightly, in dabs or swooshes or streaks, dabbing some of it off with a paper towel so the patterned background still shows through a bit.


            (Below, a close-up of the cool texture created from the glued-down, wrinkly tissue paper!)


                            I used a scruffy stipple brush to pounce on some random dabs of pink here..              


                   Then use your flat brush to lightly paint the flowers themselves, using some watered-down acrylics.  Don't completely cover them; as long as the paint is thin, the patterns underneath should still show through faintly.


                        Add more interest to the background with textural stamps, bubble wrap, etc.                              

                         Highlight the edges of your flowers with some shiny metallic gold paint.  I love                                             this step, it really makes the colors shine!


                        Then, for the best eye-popping trick of all, use watered-down black paint and your thin liner brush to outline both the inner and outer circles of your flowers, and quickly add stems                                                                 and leaves, as well.


          Ta-da!!!! You're almost done!  Now the hard part.  I look at these and want to add some words, some delicate morsels of inspiration.....but what?

 I always have the hardest time finishing a project.  Starting a project is simple, I have oodles of ideas constantly swimming in my brain and I love to start new things...but finishing up an old project, taking the time and patience to persevere when I just want to clean it up and show it off...that's the hard part for me.    It's like putting a fine wine into the wine cellar and waiting for it to slowly, slowly age to bring out its perfect flavor.  No rushing allowed.  Same with art.  That final stroke, that final touch to a piece, whether it's a masterpiece to show off in a museum or just to stick to the fridge with a magnet....requires patiently waiting for that muse to come to life, bringing you that "aha" moment, that "eureka!"  Sometimes it never comes, and I'll just throw something down just to be finished.  And sometimes that's ok too.  Not every work is going to be a masterpiece.  (insert quote of a sports hero who missed a lot more shots than he made, struck out a lot more than he made homeruns, etc.)
                                 

While I play around with these finishing touches, still churning around in my brain,
I'll leave you with these closer images of what I've got so far.


                                             I would love to eventually print some of these out as greeting cards or something, to start a little business, resurrect my etsy.com shop again...we'll see.  for now it's                                                                     just for fun.


                                ok, here is, the final product. or 2 of them, anyway.  still waiting on the muse                                          for the others.  my process: find some words, quotes, or Scripture.
                                             experiment with fonts and papers.  I used my hp photosmart inkjet
                                             for these, one on white cardstock and the other (below) on
                                           transparent tracing paper, so the colors showed through.                                  

peek-a-boo!! (Hebrews 11:1, if you zoom in..)


                                                close-ups of textures and patterns.


                                               this was fun!  thanks for watching!

Friday, November 14, 2014

painted paper flower collage: sneak peek (more on the way!)

 Something new is in the works..i'll be back later with the finished project.  Stay tuned and keep on 
creating!  It's what we were created for!
(as of Sat. 10:30 pm, still working on it, check back tomorrow!) ;-)


Thursday, November 13, 2014

quick art


cold grey day in November.  a tad gloomy outside.  a bit sad inside, so i needed to do some quick happy art to keep moving forward.
yes, a little sad, but it's ok, it's a bittersweet kind of sad, satisfyingly peaceful, pure and good.

so i did a quick 2-page layout in my art journal.

first i gathered up some motivating images and phrases i'd cut out from magazines awhile back.


i got out my paints and chose ocean-y turquoise for the background, stamped on a wavy pattern in teal...


                        .and just for fun..some fiery red circles printed by dipping a jar lid in red paint.


                                           there. background complete.  now the hard part:
                                                   waiting for the paint to dry.


                                         a little break with some warm chai tea helps...


                                                 Time to glue on the images and words.                                                                  

                                               I love doing this...


                        ...doing this while listening to Christian worship music always helps me too...
                                               soon the day becomes less gloomy.

                                     
                                                                  and i like that.


Monday, November 10, 2014

sad art

my assignment this week: sad art
yep, you heard that right. my assignment from my counselor this week was not to make something that would inspire me or cheer me up, but to be real with my emotions and express them truthfully, unapologetically, through my art.  so here goes.

the place for this expression is, again, my art journal.  this place where i've begun to express myself by putting down collages, using paint and other art media combined with cut-out images from magazines, images and colors that speak whatever it is i'm trying to say.  a new way to use my voice. this voice that's been lying dormant for too many years.
and sometimes, this voice needs to be real.  stop sugar-coating how i'm really feeling, just to be polite and not look ugly. not any more. today it's goodbye to the happy cheerful bright colors...


                                  and hello to the moody blues.  and greys and blacks.


                                          using a bit of water from a spray bottle to blur things up a bit,
i throw down the colors in quick, slappy strokes.  mostly with cheap fat brushes from the hardware store.
                   
                                           add a few more drops of darkness with slplops of black and blue..


                                              streak it in. just go wild. don't think, just feel.


                                       sponge on a few whitish highlights if it gets too dark and muddy..


                                   and maybe get a little angry with some black streaks.


                                                        ahhh, that felt good.


oops, guess i got carried away... this happened...
I brushed so hard and wet that my page tore out of the book, had to let it dry, glue it back in.


On a separate sheet of white paper, sketch some eyes, one or two, add some depth with charcoal pencil, colored pencil, black ink.  whatever it takes.


                                    cut out the eyes and play with their arrangement on the paper.
for some reason i decided i didn't want them together, so they parted ways and flew to opposite                                                                 corners of my layout.


                                     then i typed and printed out some sad words.  (it was very difficult to find "sad" or dark images in magazines, so i'm having to improvise a bit here.)
i printed these out on tracing paper so they'd have more of an ethereal effect on the paper. i then tore them out individually, each word. i like the torn edge look, not scissor-y precision for this look.                                                                    (you'll see....)

  
                       then i decided i needed an old spooky-looking tree, or its silhoutette on my page.
                           so i drew it in white pencil on a black sheet of cardstock, and cut it out.


                                                        glued it down. bam!


                              used a black dye stamp pad to lightly ink up the edges of my cut-out words.


                                                glued down those words, randomly.


                              added some swirls of black paint, curly-q's with a long paint brush. .                                                   (not shown) ...then, for a final touch, a splash of drama... i
                                  i held up this "true red" bottle of paint waaayyy overhead, so it dropped                                            one nice big fat drop of bl-, i mean paint, wherever it wanted to land.


i also threw in a black bird on this page, see if you can find it.


                                                    i hope you like my painting.                                      


                                    i know i could've been more authentic with the red splotch...


but i wasn't feeling quite that daring..........yet.